Mar
Blog
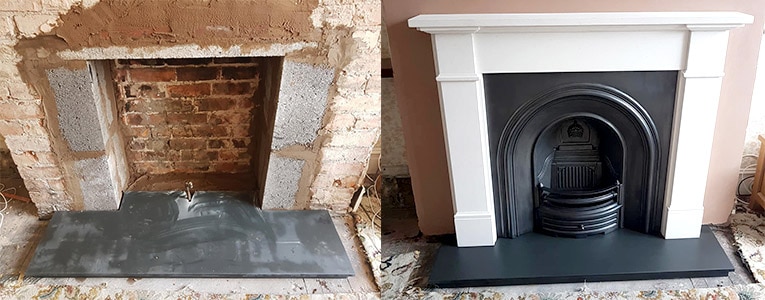
How To Fit A Fireplace
A simple guide on how to fit a fireplace
If your fireplace has tiles you should firstly stand the fireplace in an upright position. Carefully place the bottom tile into the base of the rack in a central position and very gently wedge the tile in using the small timber wedges. Once the bottom tile is it and wedged it is easy to put the rest of the tiles in using wedges to hold. The wedge should not be pushed too hard as this map snap the tile.
Now lay the fireplace down onto the floor so you can see the back of the tiles and just check they are still in position. Carefully adjust if required. Using the mixed plaster and a trowel – like you would plaster a wall, plaster the tiles in from the rear. This will set the tiles into position and stop any air gaps which can leak through with smoke or gas. Now allow it to set for at least 3 to 4 hours, or longer if possible.
Remove anything that is fitted first. You may need a steel reinforced concrete lintel available from most builders yards.
Before the fitting of the ‘new’ fireplace you will need to remove anything that is there that you are not using to get it back to how it was before any fireplace was ever fitted. If you are re-using the hearth or the firebrick back you can leave them in position if you prefer. This can be very dirty job so make sure you have either cleared the room or at very least moved back any furniture, and covered it with dust sheets etc. Don’t forget ventilation!
If the opening is small please note the following – Once removed you may have quite a small opening which may have been reduced when the modern fireplace was fitted. Don’t worry as behind this is the original opening which is often around 36“ square.
Once removed check there is a lintel. This is what holds the chimney stack up, so it would be above the opening. It can sometimes be in an arched shaped end of brick. Be sure to put in a lintel if you think you do not have one.
This can be done by gently chiseling away the mortar lines to the size of the lintel and sliding it in. Once this is in place brick up to the size required taken from either a firebrick back or an original fire-back, making sure you fill all gaps with mortar.
Laying the Hearth
This differs depending on what you will be burning.
If you are using wood or timber – this is solid fuel and you will need either a tiled hearth or a slabbed hearth and then put back together, to make it easy for you to fit. The fashion at the moment is slate; however it is the same when using granite and marble – all should be slabbed for safety. Slabbing hearths allows the expansion of heat to run down the lines and reduce the chances of the hearth damaging / breaking.
If you are using a decorative gas effect fire – the hearth can be in one piece or tiled, however the regulation states that it needs to be plinthed or built up if tiled.
Just for decoration – You can have it flat and in one piece which is what we call decorative, or plinthed. The rule of thumb is that a flat hearth looks fine when you are having a polished timber floor and plinthing looks better than you are carpeting up to the hearth, but of course it is your choice.
Fitting the Hearth
You will need quick drying cement.
On the fitting of the hearth make sure it is completely level, if it isn’t then the fireplace will also not be level – looking out of skew. Using cement, push the hearth into level position on top of a small layer of cement and allow to dry.
In the meantime fill out the area of the chimney breast to the same level. You may have been given a small back fill piece (if it’s a slate hearth) – so don’t forget this when filling out. Once this is dry then the weight of the fire / firebrick back will be fully supported when the fitting begins.
Instructions for fitting a firebrick back – please note you will still need to follow the bricking up procedure with a back that is attached. You may need two strong people here and maybe vermiculite.
Place the firebrick back into the position roughly where it will be going and then put it up to the fireplace- Here it is good to check everything is central on both the wall and, of course, the hearth. Pull the firebrick back into position up against the fireplace.
Mark the position of the fixing lugs / brackets at this stage. Now fill the back area, behind the brick, with bits of hard core. It is also advised to use vermiculite to backfill around the firebrick back. 1-2” behind the back would be ideal.
Now continue to brick up to the top of the firebrick and start to feather the bricks into the chimney. This will allow soot to fall down the chimney into the grate, to avoid it building up in the chimney which could possibly cause a chimney fire.
If the original back is on the fire make sure there is enough opening room for the damper or vent and stop the bricking up at this point i.e. The finish level should be below this point. Now fit the fireplace using plugs and good sized screws – suggested over 2” long – note this is to the wall having removed any plaster around the fitting area first. The fireplace should sit on the brick of the chimney and then be plastered up to it afterwards with no air gaps.
The firebrick back should be touching the fireplace and don’t worry too much if they do not form a seal as when the fire is lit the back gets very hot quickly and expands, hence a small gap is desirable. Please note that there should never be a gap at the back of the firebrick as it can cause turbulence, making a very poor fire.
Finally – you may need Black Grate Polish (graphite polish, metal polish etc).
All that is left to do now is to clean down everything removing cements and plaster from the fire / hearth and if necessary rebuff the fireplace with the graphite polish where finish has been damaged or removed.
Fitting a tiled insert and surround
If you are fitting an insert with a separate surround the instructions are the same with regards to the bricking up etc. The difference is that the insert will not be fitted to the wall but set off the wall – this is often the rebate size in the legs of the fireplace and is generally around 10–15cm.
A seal is needed between the two items and to achieve this once the insert is fixed in the correct position from the wall you can use plasters edgings (nice and straight and easy to manipulate) – push down into the gap and then seal with fireproof sealants or plaster until set. Once done don’t forget to screw the surround to the wall.
Please note fireplaces can individually differ and this guidance is only given as general advice. We cannot accept responsibility for the workmanship of anyone other than our own fitters.